Guides
Set Up Identity Continuity
Configure automatic IdP failover with health monitoring, Schema Abstraction Layer, and simulation testing
Reducing Single Points of Failure
Layer Identity Continuity configurations across deployment tiers to eliminate IdP single points of failure
By the end of this guide, you will have a Maverics deployment that automatically fails over between identity providers when one becomes unavailable — keeping your users authenticated without any service interruption.
Console terminology: In the Maverics Console, Continuity is configured as a
Continuity Strategy under Identity Fabric. In YAML, this maps to a connector
with
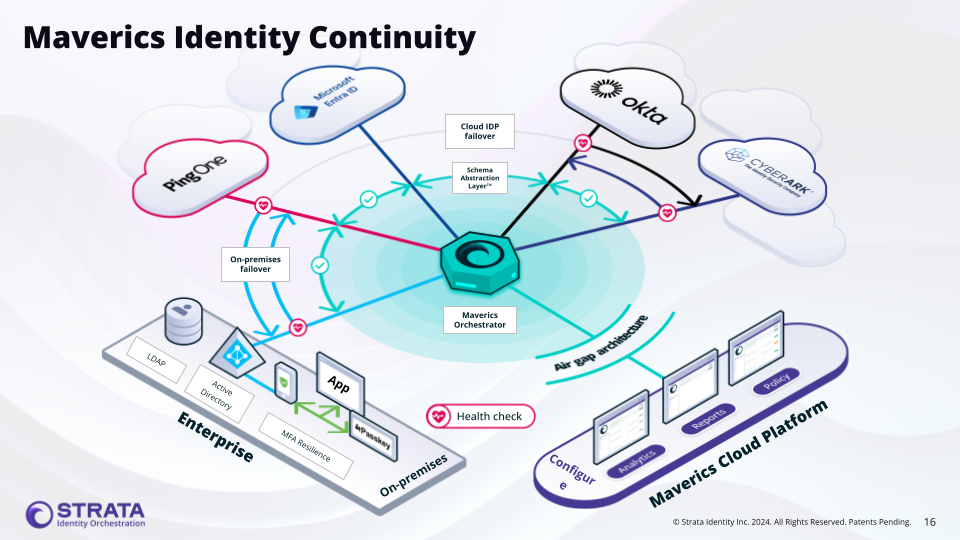
type: continuity.Why Identity Continuity?
Unplanned identity provider outages can lock out every user in the organization. Whether your cloud IdP has a regional failure, a network partition isolates your on-premises directory, or a provider pushes a breaking change — the result is the same: nobody can log in. Identity Continuity is a high availability prevention system, not a backup or recovery tool. It does not restore service after an outage — it reduces the risk of an outage affecting users. The Orchestrator continuously monitors each identity provider’s health and reroutes traffic to a healthy alternative before users ever see a login failure. Two primary use cases drive most Continuity deployments:- Cloud IdP fails over to on-premises directory — Your primary cloud IdP (e.g., Okta, Entra ID) becomes unavailable, and the Orchestrator routes authentication to an on-premises LDAP or AD connector.
- Cloud IdP fails over to another cloud IdP — Your primary cloud IdP becomes unavailable, and the Orchestrator routes to a secondary cloud provider.
Identity Continuity keeps authentication working when a provider goes down. If you need to permanently migrate users from one identity provider to another, see the IdP Migration guide instead.
Prerequisites
- A running Maverics Orchestrator — If you have not installed the Orchestrator yet, follow the Quick Start guide or see the installation reference.
- At least two identity provider connectors configured — You need a primary and one or more backup identity providers. See the Identity Fabric reference for supported providers and connector setup.
- User identities synced across identity providers — Your identity providers must already have the same user accounts provisioned. Failover to a backup IdP will fail if that IdP does not have the user’s account. Typically this is handled by an Identity Governance and Administration (IGA) product or directory synchronization tool that keeps your identity stores in sync.
- A deployment configured — Your Orchestrator needs an active deployment with a configured storage provider. See the Publishing Deployment Configs overview for setup details.
Configure Identity Continuity
Configure your identity providers
You need at least two identity services — a primary that handles authentication under normal conditions and one or more backups that take over when the primary is unavailable. Each provider gets its own Identity Fabric connector with independent credentials and configuration.
- Console UI
- Configuration
- Navigate to Identity Fabric in the sidebar and click Create.
- Select your primary provider type from the list (e.g., Okta (OIDC), Microsoft Entra ID (OIDC), or Generic OIDC Configuration).
- Fill in the connector form with your primary IdP’s credentials — client ID, client secret, and discovery URL.
- Click Save.
- Repeat steps 1-4 for each backup identity provider.
primary-okta and backup-entra-id) to make the failover order obvious when configuring the Continuity Strategy.Enable health monitoring on each identity service
Health monitoring must be enabled on each individual IdP connector, not on the Continuity connector itself. The Orchestrator polls each IdP’s health endpoint at a configurable interval and uses the results to decide when to trigger failover.
- Console UI
- Configuration
- Open each identity service you configured in the previous step.
- Scroll to Identity Service Health Monitoring and enable it.
- Configure the health check settings:
| Setting | Recommended (Testing) | Recommended (Production) | Description |
|---|---|---|---|
| Polling frequency | 10s | 30s-60s | How often the Orchestrator checks the IdP’s health |
| Timeout | 10s | 10s | How long to wait for a health check response before marking it as failed |
| Failover threshold | 3 | 3 | Number of consecutive failures before triggering failover |
| Fallback threshold | 3 | 3 | Number of consecutive successes before routing traffic back |
- Optionally enable Custom Health Check for more granular control over what constitutes a healthy response.
- Click Save.
- Repeat for each identity service in your Continuity configuration.
Create a Continuity Strategy
The Continuity Strategy is the component that orchestrates failover between your identity providers. It wraps your IdP connectors and adds routing logic based on health status.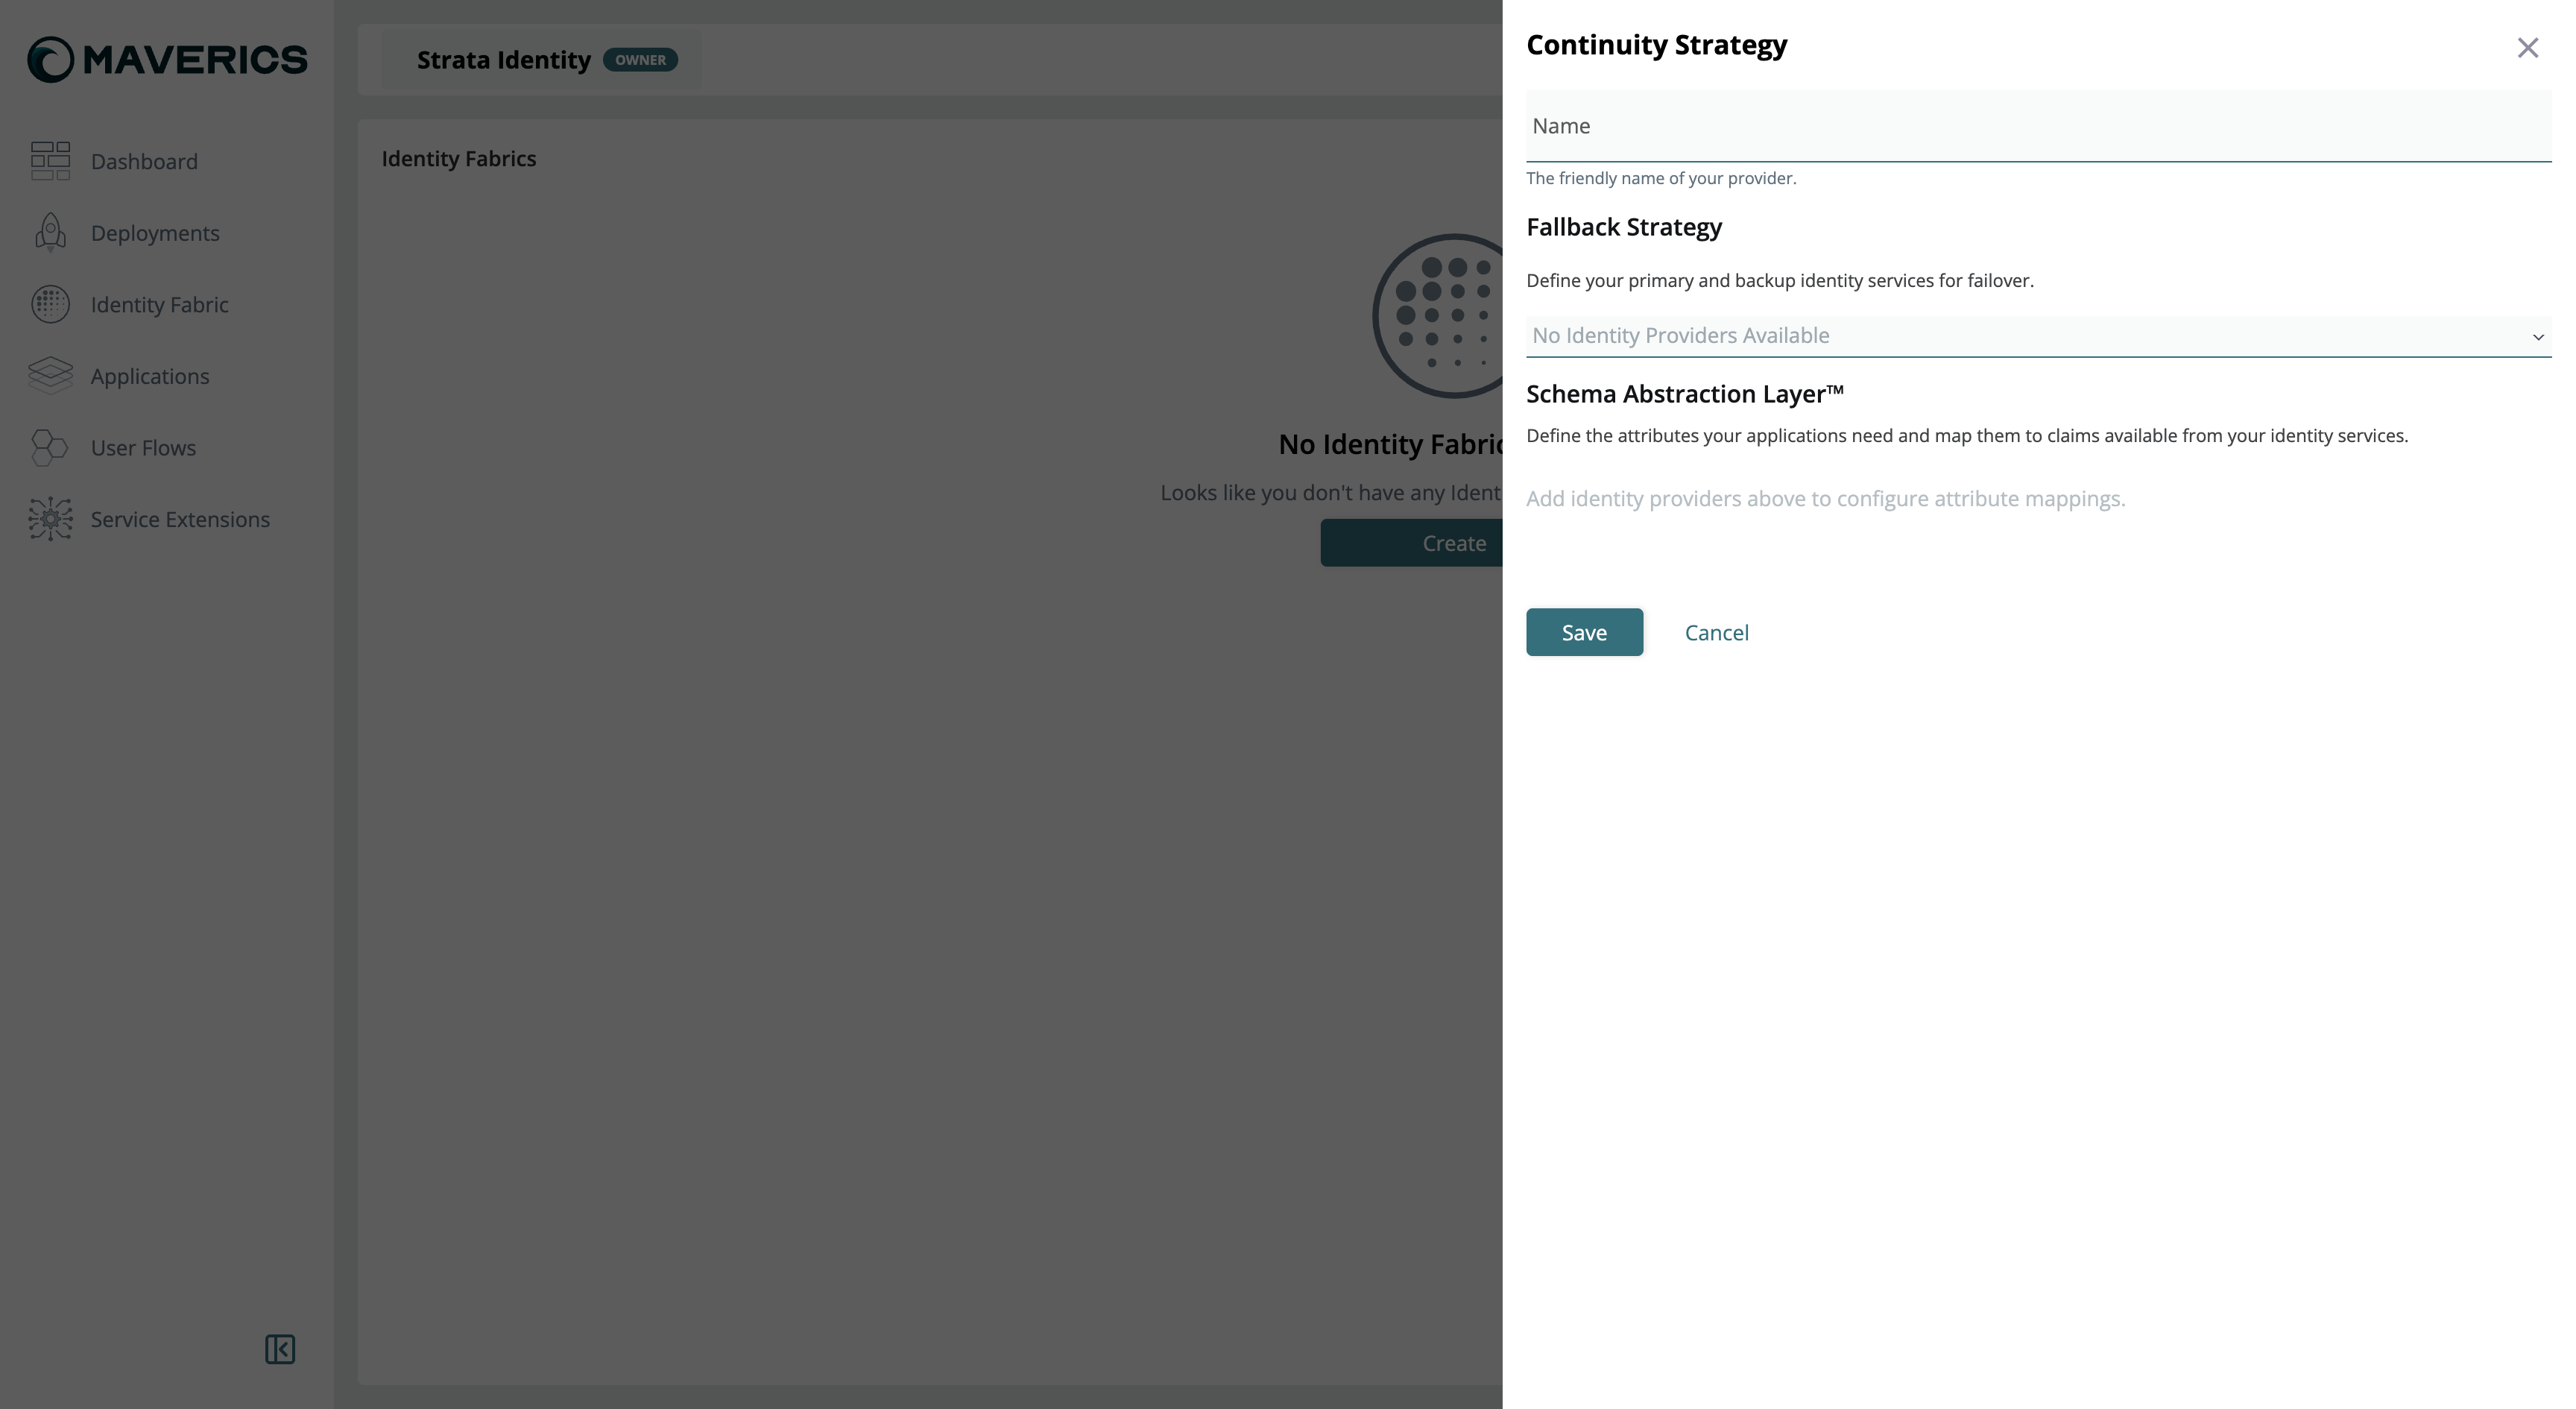
- Console UI
- Configuration
- Navigate to Identity Fabric in the sidebar and click Create.
- Select Continuity Strategy from the list.
- Enter a name for the strategy (e.g.,
ha-failover). - In the Fallback Strategy section, add your identity providers in priority order — primary first, then backups. The dropdown lists only identity services you have already configured.
Configure the Schema Abstraction Layer
The Schema Abstraction Layer maps attributes from different IdPs to consistent names. When failover occurs, your applications receive the same attribute names regardless of which IdP authenticated the user.For example, one IdP might call the email attribute 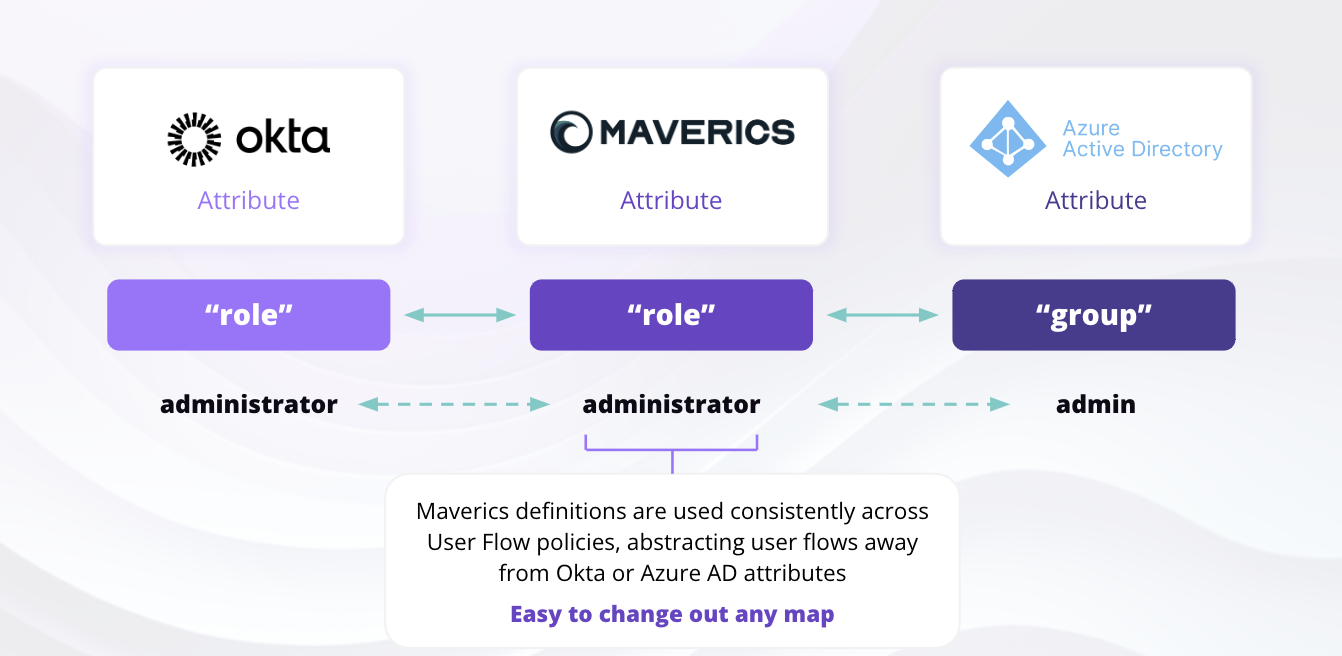

preferred_username while another calls it mail. The Schema Abstraction Layer normalizes both to a single attribute name (e.g., email) that your applications can rely on.- Console UI
- Configuration
- In the Continuity Strategy configuration, scroll to the Schema Abstraction Layer section.
- For each attribute your applications need (e.g., email, name, role), click to add a row.
- Enter the normalized attribute Name (what your applications will see).
- Map it to the corresponding claim name from each identity service.
- Optionally set a Default value for cases where the attribute is unavailable from any IdP.
- Click Save.
Bind the Continuity Strategy to your application
Update your application configuration to use the Continuity Strategy as its authentication provider instead of a specific IdP connector. This is the same binding pattern used in other authentication guides — the only difference is that you reference the Continuity Strategy instead of an individual IdP.
- Console UI
- Configuration
- Navigate to User Flows in the sidebar and open your application’s User Flow.
- Under Access Control Policies, select the Continuity Strategy from the Select an authentication provider dropdown.
- For headers or claims, update the provider to the Continuity Strategy and select attributes from the Schema Abstraction Layer.
- Click Publish Preview to review changes, then click Publish to deploy.
For SAML and OIDC app user flows, select the Continuity Strategy from the Authentication menu. For proxy app user flows, create an access control policy and select the Continuity Strategy as the authentication provider.
The Orchestrator handles protocol translation automatically. Your application does not need to support the same protocol as your identity providers. For example, an OIDC application can authenticate users through a SAML or LDAP identity provider — the Orchestrator translates between protocols transparently.
Test your Continuity Strategy
The Maverics Console includes a simulation feature that lets you test failover behavior without waiting for a real outage. When publishing changes, you can enable simulation to cycle through test phases automatically.
- Console UI
- Configuration
- When publishing your configuration, toggle Simulate Continuity Strategy.
- Set a time interval for the simulation cycle (e.g., 60 seconds per phase).
- Click Publish to deploy with simulation enabled.
- Test primary — Authenticate using your primary IdP credentials. Verify login works normally.
- Test failover to secondary — The primary appears unavailable. Open an incognito window, go to your app URL, and verify the login redirects to your secondary (backup) IdP.
- Test tertiary (if configured) — The secondary also appears unavailable. Verify failover to the third IdP.
- Test fallback — The secondary comes back online. Verify traffic routes back to the secondary.
- Test fallback to primary — The primary comes back online. Verify traffic routes back to the primary.
Your Maverics Orchestrator is automatically routing authentication between your identity providers based on health status.
Troubleshooting
Health check is not triggering failover
Health check is not triggering failover
Check the Orchestrator’s debug logs for health check messages. Look for log entries like:Common causes:
- The well-known endpoint or LDAP server is not reachable from the Orchestrator’s network.
- The
unhealthyThresholdhas not been reached yet — the Orchestrator requires the configured number of consecutive failures before triggering failover. - Health monitoring is not enabled on the individual IdP connectors (health checks are configured on each connector, not on the Continuity connector itself).
Attributes are missing after failover
Attributes are missing after failover
Verify the Schema Abstraction Layer mappings cover all attributes your application needs. Each IdP may use different claim names for the same data (e.g.,
email vs mail vs preferred_username).Check that attributes[].mapping entries exist for every IdP listed in the failover.idps array. If a mapping is missing for an IdP, the attribute will be empty when that IdP handles authentication.Simulation mode is not working
Simulation mode is not working
Simulation mode is only available through the Console UI publish flow. Verify that you:
- Toggled the Simulate Continuity Strategy switch before publishing.
- Set a time interval for the simulation cycle.
- Published the configuration after enabling simulation.
Fallback is not happening after IdP recovers
Fallback is not happening after IdP recovers
Verify that
healthyThreshold is configured on the individual IdP connectors. The Orchestrator requires the configured number of consecutive healthy checks before routing traffic back to a recovered IdP.Also check:- The health check
interval— enough time must pass for the required number of healthy checks to accumulate. - The recovered IdP’s health check endpoint is actually responding successfully.
- The Orchestrator logs show health check success messages for the recovered IdP.
Related Pages
Continuity Connector Reference
Complete configuration reference for the Continuity connector — failover, routing, and attribute normalization settings
IdP Migration
Migrate between identity providers with zero downtime using the same Continuity connector
Identity Fabric Reference
Supported identity providers and connector configuration for Microsoft Entra ID, Okta, Auth0, and more
Sessions Reference
Session management, invalidation, and storage options for the Orchestrator